|
Muzzle Blasts Online |
|
...for the muzzleloading enthusiast |
|
The muzzleblasts.com domain, subdomains, content, etc., are neither affiliated with the NMLRA nor its paper magazine Muzzle Blasts |
|
Muzzle Blasts Online |

|
|
|
|
|
|
Kits and Fits
Editor's Note
Unfortunately, the graphics for figures ten through fourteen are not available and are therefore missing from the article.

|
|
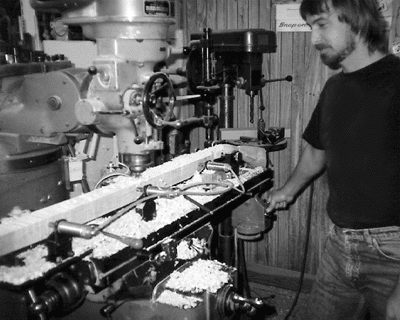
Fig. 1. Roy Prater of Pecatonica Long Rifle Supply Company, makes adjustments on the 24-spindle Saestrom carving machine. |
My first experience with ML rifle kits came about 25 years ago when I received a pre-shaped (read as "pre-ruined") stock in which the lock could be placed into its mortise by dropping it from shoulder height into the stock lying on the floor. Such experiences gave ML kits a bad name, the enduring stigma of which has persisted to this day; hence, many suppliers of ML kits prefer to call their products "semi-finished" or "assemblies." For the purpose of this article, I shall use the term "kit" for the sake of expediency to refer to a set of parts to be assembled.
For those of us who have been soured on the kit concept in the past, let me tell you that there is a whole new world out there. A wide variety of well designed and executed kits with pre-shaped stocks is available to the aspiring rifle builder. The precision of inletting and the attention to historic accuracy of ML kits has improved markedly from the haphazard assembly of ill-fitting parts included in some imported products years ago. In fact, in conversations I've had with several nationally-known rifle makers, they have admitted (somewhat sheepishly, like the parents who admit to eating the kids' Frosted Flakes) that they now resort to kits from time to time. The era of building from kits is now well established, with excellent results very much in evidence.
The central figure of the kit is the pre-shaped stock. The technology for the efficient duplication of wooden objects (such as table legs and gunstocks) has been around for a long time; Blanchard profiling lathes were installed at the Harper's Ferry Armory in the 1820's, enabling operators to turn out a musket stock a day from the rough blank1. By the early 1900's the industrial revolution had taken over a large segment of the stocking business, and many of the "oldy but goldy" models are still happily churning out precision stocks today. An example is shown in Fig. 1, courtesy of Pecatonica River Long Rifle Supply Company of Rockford, Illinois. This particular system, in which two dozen stocks can be shaped at once, is a 1928 Saestrom furniture carving machine obtained from the Rockford Peerless Furniture Co. Pistol stocks and halfstocks can be fully carved on this machine, while fullstocks are shaped only from the buttstock through the lock panel area. Fullstocks are then transferred to a milling machine to shape channels for straight-sided barrels (Fig. 2). For swamped barrels, as well as ramrod grooves, lock, and trigger inlets, an impression can be taken of the inlet profile in some sort of moldable material, which can then serve as the master for inlet cutting in a profiling machine such as the Hoenig-Rodman or Allen duplicators2.
|
|
Fig. 2. After shaping the buttstock, Doug Greensides places the stock in a fixture of his own design for milling of the barrel channel. |
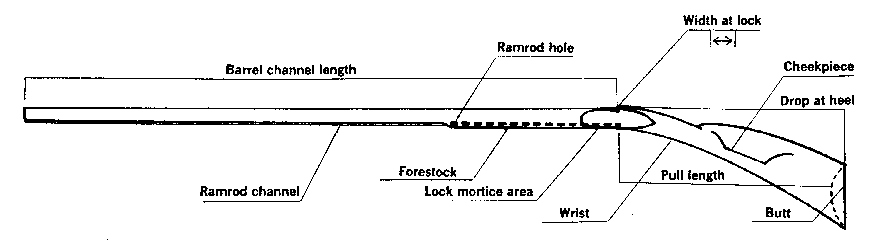
Another advantage of the kit is that the builder will not go far astray as to stock dimensions or in general architecture. I remember my first rifle built 40 years ago. The stock was a slab of Kentucky walnut from a floor joist out of a house built around 1828 (so I guess it was well seasoned). When I inletted the buttplate, I decided to allow for multiple mistakes, so I started out with a 17-inch pull, feeling that my first attempt would chew up at least 2 inches, and therefore everything would come out right in the end. Alas, my initial attempt at fitting went fairly well and I ended up with a pull that would fit Goliath perfectly. While the kit would prevent such youthful folly, its advantage carries an inherent disadvantage, as it does not allow variations as to length of trigger pull and drop in comb to fit a specific individual. This disadvantage is more important in the fit of a shotgun than it is in a rifle. In Figure 3, the various areas of the pre-shaped stock are designated. While some dimensions, such as those of the cheekpiece, can be altered to some extent, the pull length and drop are pretty much set. Note that if you insist on shortening the pull, you will decrease the drop also, but this alteration will require trimming the toe of the buttplate.
|
|
Fig. 3. The major dimensions of a muzzleloading rifle stock as illustrated in the current catalog of the Pectonica River Long Rifle Supply Co., Rockford, Illinois. Taken by permission. |
Once your kit arrives, note whether the packing is intact, and make sure that parts, such as the barrel, are not protruding from the carton. If parts are sticking out, chances are that they have received damage, and it is better to file a claim with the carrier through the supplier at this point. If everything looks OK, unpack it carefully and lay out the parts on the floor. Resist the urge to rush to the work area to create a wood dust storm. Make sure all parts are there (hopefully there is a check list included with your kit). Often, screws and other sharp little parts work their way out of plastic bags during shipping. Check to see if the stock has been cracked in transit; the wrist and foreend are the vulnerable areas, particularly in highly figured curly maple. Don't expect to work the stock and then send it back to the supplier with "shipping damage.''
If everything is in order, take the precaution to protect that fragile foreend of the pre-shaped full stock (the following obviously does not apply to halfstock kits). Since the ramrod hole on the pre-shaped stock will be drilled its full length, you can insert the ramrod blank (which is provided in many kits) into the stock and secure it with a twist-tie or a couple of sturdy rubber bands (do not use tape because the adhesive penetrates the wood and will sometimes affect staining by decreasing the porosity of the wood. The ramrod in its groove and secured to the stock reinforces the foreend. However, do not insert the ramrod and let the untrimmed section protrude beyond the end of the stock! The untrimmed, unsecured ramrod can be a ticking time bomb if left protruding from the end of the stock: a young friend caught the end of the protruding rod on the workbench and split out the bottom of his stock at the entry thimble area. Prevent this by doing the following: 1) insert the ramrod as far as possible into the hole (you might have to sand the rod a bit to get a good sliding fit); 2) mark the rod even with the end of the barrel channel; 3) remove the rod and make sure that it will be as long as the barrel (not the barrel channel). If not, either it did not go into the stock fully, or the ramrod hole is not drilled deep enough. Remember that the rod should go back to the forward trigger guard trunnion (and on Hawken trigger/guard assemblies, it can go back to the forward tang bolt). Hold the rod on the outside and see how far the hole goes, or insert a smaller diameter rod to determine if there is just a small clearance problem. Cut the ramrod off to the correct finished length for now; you will shorten it a bit later when you fit the tips. If your kit did not come with a ramrod blank, then insert a dowel of suitable diameter and length for now (most pre-shaped stocks are drilled for 5/16" or 3/8" ramrods). This will stabilize the foreend while doing barrel inletting, which is the next operation. Do not push in a dowel which offers resistance. Once in the deep hole of the forestock, even a slightly oversized dowel will be hard to remove.
Tom "Ol' Bear" Harbin showed me how to protect the fragile foreend by inserting a thin slat, which is just a snug fit, into the barrel channel. The slat should be about half as thick as a barrel flat; when held in place with tape or rubber bands, it will reinforce the whole foreend, protect the delicate edges of stock along the channel, and provide a final reference when finish sanding the top of the channel. If the barrel channel is too long, you may want to trim it a bit, but don't cut it shorter than the length of the barrel.
|
|
Fig. 4. Cutting across the grain takes a sharp chisel which leaves a clean shoulder to support the breech. |
|
|
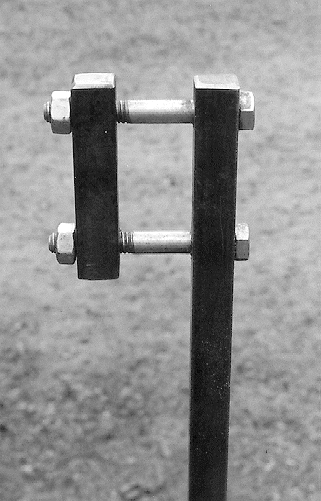
Fig. 5. This breechplug wrench is simple to make, adjustable, and grips breechplugs without marring. |
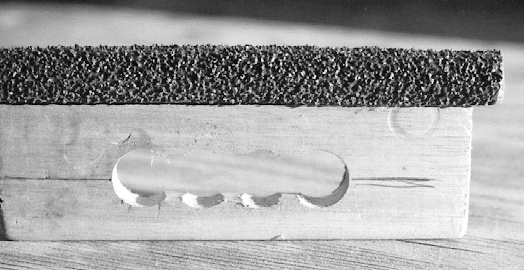
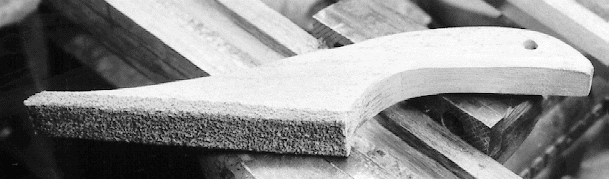
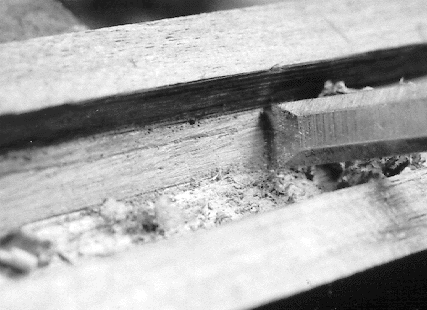
The barrel channel may have to be widened slightly by sanding or scraping. If you must remove wood along the channel, you can make handy little channel sanders (such as those shown in Fig. 6a and 6b) from shop scrap and cover them with the coarsest sandpaper you can find (probably #24 grit). You can use a 5/16" or 3/8" straight chisel to scrape the bottom three flats of the channel (Fig. 7), but do not use both methods alternately since the coarse grit left in the channel will ruin the fine edge of your chisel.
|
|
Fig. 6a. A variety of sanding blocks can be made to smooth and enlarge the barrel channel. |
|
|
Fig. 6b. You can custom-fashion a sanding block for a specific area in a few minutes using scrap wood around the shop. |
|
|
Fig. 7. A regular straight chisel makes a good scraper for deepening the channel where the inletting black shows high spots. |

|
|
Fig. 8. The tang must be filed with a slight taper to the underside to allow enough draft for inletting. The tang must be bent to conform to the top curvature of the stock. |
|
|
Fig. 9. This nail can be tapped from underneath to lift the breech away from the shoulder of the barrel channel to avoid splintering of the top of the stock. Then the hole can serve the installation of the tang bolt. |
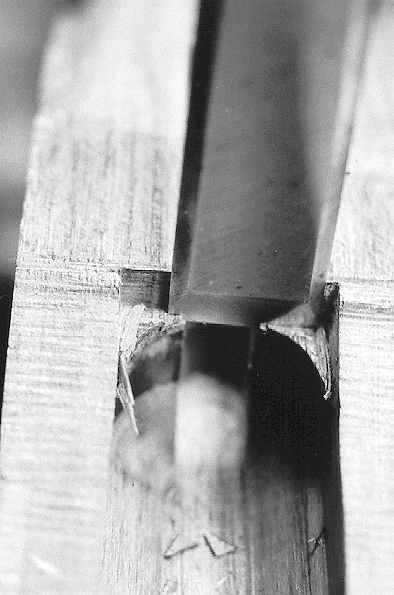
Once the barrel is secured in the stock, your next area of vulnerability is the mortise for the buttplate. The butt area of most pre-shaped stocks looks somewhat like Fig. 12a. The raised center area must be removed before the butt-plate can be installed. The safest and fastest way to remove the wood is to drill a series of holes with Forstner bits as shown in Fig. 12b. This removes 90% of the wood and allows easy chiseling away of the remaining web. Be careful of damaging the surrounding area as your buttplate must mate up closely to it. Beware of rasps or chisels contacting the outer mating surface. Once this area is smoothed, work the buttplate in with inletting black to detect high spots. On rounded buttplates with long returns such as on the Jaeger rifles, it was customary to install a long third screw at the apex of the buttplate, which really pulls it down tightly to the wood and extends it well into the mortise.
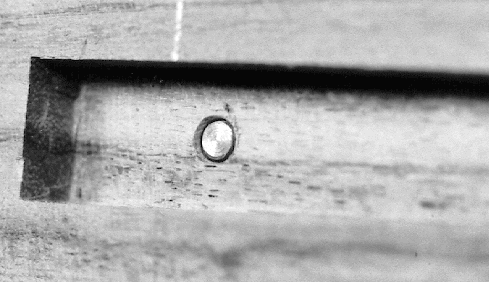
Be sure that the lock bolster fits tightly against the barrel with the lock bolts installed properly. Manufacturers of pre-shaped stocks often will leave a lock mortise a bit shallow rather than overcut, so that when the plate is drawn tightly into the mortise, a thin gap still shows between bolster and barrel. Closing this gap is particularly important for a flintlockimagine what would happen if enough of a gap existed to allow fine priming powder to sift down into the lock mortise to accumulate priming after priming until.......
Once the plate is precisely inletted, you can determine the correct length of the lock bolts. However, first you must install the side plate through which the lock bolts pass. Some pre-shaped stocks come inletted for a specific sideplate, but most do not. If your stock does not have an inlet for the sideplate, now is the time. Although the sideplate is one of the easiest pieces of hardware to inlet, its dimensions and location determine the placement of the two lock bolts. Chronic insomnia, tremors, and twitches, muffled mutterings, and reversion to knitting as the major pastime may result if the forward lock bolt passes through the ramrod hole. To preclude bringing such afflictions upon yourself you should read a recent article by Peter Alexander3, which goes into all the sideplate subtleties, before proceeding. Many late percussion rifles had only a single bolt, to the relief of some gunsmiths. Regardless of whether you need one or two lock bolts, remember that when you tap the holes in the plate, do it from the sideplate side. When you run your tap through the whole stock, the thread is lined up correctly with the axis of the hole. Once that's accomplished, be sure to cut off the ends of the lock bolts which protrude through the plate, or you won't be able to mount the outside parts such as hammer and feather spring. A foolproof way (which at least works for this fool) to cut the bolts without mangling the threads is to run the proper size die (usually 8-32 or 10-32) onto the bolt, leave what needs to be cut off sticking out, and cut off the excess. When you turn the bolt out of the die, it will resize the thread out to the end so that you can easily start the bolt back into the plate.
Once the plate has been snugly fitted, mount the bridle and tumbler on the plate with the appropriate screws and replace the assembly in the mortise. Install the lock bolts, pull them up snug and see if the internal parts are keeping the plate from seating properly. A light coating of inletting black (or soot from a tallow candle) on internal surfaces will highlight interferences. Keep adding part by part, checking for interferences until everything is in and the lock cycles without interference. Ol' Bear "warms up" the mainsprings on his locks gently by working them back and forth in partial cycles before drawing them to full cock much as an athlete does stretches before an event.
Some kits come with trigger mortise uncut. In such cases, you must drill a hole from the understock up to the sear. Use a nail or a drill bit to push up on the sear to allow cycling of the lock when testing clearance of its innards in every position. Note: on flintlocks (which always seem more complicated), you must cut a slight recess in the stock over the top of the plate to allow the hammer to come to rest. If you do not make allowance for the hammer fall, it will crush the wood in that area.
Chances are the vent hole will not be drilled into the barrel for a flintlock, nor the drum installed for early percussion models (most kits for late percussion rifles have a cast breech with a hole for the nipple drilled and tapped). Usually vent liners (either stainless or Ampco) are supplied with the kit. Locate the vent hole centered in the pan and even with the top of the pan, not down deep like a drain hole. You want the priming powder to flash through the hole, not burn down to it. Although mechanical engineers say that a hole tapped with 50% thread is sufficient for most applications, I like to humor my sense of safety here by tapping at least 80% of full thread. Refer to a machinist's table for the correct size tap drill. Same for the installation of drum and nipple. Remember that you don't want a hole that is smaller than the minor diameter of the thread (which is 0.206" for 1/4 X 28, 0.267" for 5/16 X 24, and 0.324" for 3/8 X 34) or you will drag the tops off the female threads and weaken them.
The only other heavy duty area to complete before you have a functional (but not complete) rifle is to install the trigger(s). Set triggers require a pretty extensive mortise such as the one I milled in Fig. 14. Even on a milling machine, cutting a trigger mortise is tedious because of understock curvature. It's not exactly comforting to consider that the wrist is a weak area where you don't want to cut away any more wood than is absolutely necessary. I find that it helps to burn incense and recite the 23rd Psalm before beginning. If the mortise is not cut in your stock (and some are not, allowing flexibility of trigger choice), then you proceed by making the inlet just wide enough to accept the upper projections of the trigger assembly. On set triggers, the sear should fall at the midpoint of the two triggers, but other considerations might predominate here. You can adjust pull length here slightly by shifting the trigger fore or aft. But consider this: shifting the trigger assembly back will mean that travel of the forward trigger will increase in order to set off the lock when the triggers are in the unset mode, while the travel of the trip trigger will decrease (not a big consideration unless the angle of the trip trigger keeps the sear from engaging when triggers are unset). As shown in Fig. 14, I pencil in a line showing where the sear arm lies and adjust the trigger position accordingly.
Oh, yes, one last thing. That hole in the deeper mortise shown in Fig. 14 is for the tang bolt which threads down through the trigger plate. If the conical head of the tang bolt is to nestle nicely in the tang, the tapped hole in the trigger plate must intersect it at an angle. The position of the tang bolt will be determined in no small part by where it is allowable to tap into the trigger plate. I make marks to delineate the allowable area, then draw a line through that area which is also squared with the angle (actually a radius) of the tang. I then set the whole assembly up on an angle plate on the drill press with the barrel removed. I drill down through the longitudinal axis of the tang mortise, parallel to my line on the stock using an undersize bit (such as a 7/64). The bit will mark the trigger plate where it intersects it. If centered in the allowable area, drill back up the other way with the barrel tang in place. That will mark the underside of the tang where the bolt will be positioned. Even so, I drill through with a bit slightly undersized relative to the major diameter of the bolt. That way, if I am off a few thousandths, I can file the hole to true center. Owning a rifle you've made with an off-center tang bolt is about as cool as walking around with your shirt mis-buttoned (remember how Mama said to start buttoning from the bottom and make sure the ends match).
The matter of sight installation is a pretty simple one except for two considerations: 1) muzzleloading barrels need only one vent hole each, so if you are attaching a rear sight with screws, remember to watch that you don't drill all the way through the barrel into the bore; 2) if you are a member of the graybeard society, mount the rear sight a couple inches farther down the barrel than usual, for presbyopia doesn't improve as we get older. Most sights are installed via dovetails; I noted one graybeard's rifle with three dovetails cut into the top of the barrel, each neatly filled with a carefully filed insert, and a fourth one, farthest down the barrel, containing the sight. That barrel constituted its owner's optical calendar.
By this time, you will have an instrument which makes smoke and throws balls considerable distances in a controlled direction, but you still have a long way to go. Of course, most rifles have patchboxes, toeplates, barrel key (or pin) inlays, muzzle caps, and ramrod thimbles (except some heavy target models). Many pre-shaped stocks are cut for the patchbox cavity and partially inletted for ramrod thimbles and even muzzle cap. Reference to an earlier Muzzle Blasts article4 will help with inletting these parts.
Once the rifle is functional, don't be too proud to use your rifle for a while in the white before finishing (although walking around in the wet woods with a raw rifle does not do much for its stock or your camouflage). [Note: Also keep in mind that oil from handling and/or cleaning will penetrate wood and make staining/finishing very difficult. Likewise, powder fouling will stain wood, especially when cleaning the barrel or lock with water]. Usually, there are little adjustments to make to moving parts or supplemental stock shapings to make it feel better to you. You might even want to add an inlay or two which are historically compatible with your school of rifle. I added a sling to one of my Jaegers after years of use. Although applying the finish carries with it an air of finality, somewhere down the road you might say to yourself "maybe if I just make this little change...".
References
- Bivins, J. "Stock Duplicator – Crutch or Tool?" Rifle, vol. 93, May/June 1984, p. 18.
- Ibid.
- Alexander, P.A. "The Gunsmith of Grenville County", Muzzleloader, July/Aug. 1992, p. 21.
- Stutzenberger, F. "Decorating your First Rifle. Part II: Inlays." Muzzle Blasts, Oct. 1994, p. 8.
Suppliers
Stocks, components, and semi-finsihed rifles:
- Don Eads' Muzzleloader Builders' Supply , Pecatonica River Long Rifle Supply Co., Jim Chambers Flintlocks, Ltd., Dunlap Woodcrafts, Tiger-Hunt. Please see the ads throughout this issue for names of additional companies.
Tools and Supplies:
- Enco Manufacturing Co. (1-800-873-3626)
- Hartville Tool (1-800-345-2396)