|
Muzzle Blasts Online |
|
...for the muzzleloading enthusiast |
|
The muzzleblasts.com domain, subdomains, content, etc., are neither affiliated with the NMLRA nor its paper magazine Muzzle Blasts |
|
Muzzle Blasts Online |
|
|
|
|
|
|
Make an Old-time Shooting Box
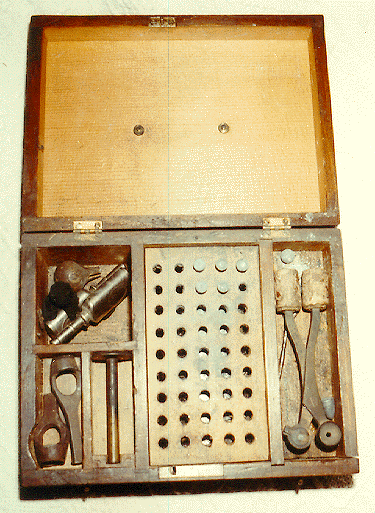
Serious target shooters invariably need to haul an assortment of tools and accessories to the range. Most of us have adapted fishing boxes or tool boxes to the purpose, and some shooters have made or purchased wooden boxes made expressly for their needs. The use of shooting boxes is not unique to present-day shooters, as the accompanying photos of two nineteenth-century specimens will attest. Both boxes appear to date from the heyday of the American muzzleloading target rifle, i.e., the third quarter of the last century. The accessories present in each box tell us a little about the rifles with which they were used, and even convey a smattering of the personality of the shooters. I wager that the contents of our shooting boxes and possibles bags today reveal more than a little about our shooting pursuits, tastes, inventiveness, and skill with tools. I'll inventory the items found in each box and follow the lists with detailed plans so that anyone with a few simple hand tools and a desire to own such a box can fashion a precise copy.
|
|
Box Number One |
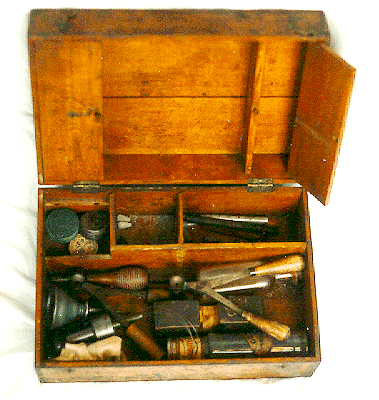
The Second Box is dovetailed at the corners; there are five dovetails in the top and seven in the bottom. The box is constructed of maple one-quarter of an inch thick. The top and bottom consist of two pieces which together are about eight and three-eighths of an inch wide. The lid has two compartments with doors which swing outward. They are empty now, and I can only speculate on their intended use. I don't believe they were intended for anything heavy, and I envision them holding cleaning patches.
The contents of this box include the following: one small tin of upholstery tacks (presumably for posting targets); one round cardboard cap box (G.D. Qualité supérieure) filled with precut cotton or linen shooting patches approximately .011" thick by slightly more than one inch in diameter, clearly for a small caliber;and one tin of percussion caps: "J. Goldmark's Percussion Caps (1855, 1858, 10-6-1925) Made by the Winchester Repeating Arms Co., New Haven, Conn."
|
|
Box Number Two |
Rounding out the content of this box are one tin oil can; one combination screwdriver/nipple wrench tool; one muzzle rest with octagon cutout for a barrel 1 7/16" across the flats; one glass olive oil bottle filled with FFG black powder; and one brass, wood, and steel bullet guide starter for a barrel turned to 1 3/8" at the muzzle.
Box No. Two may once have had a bullet block along its left wall, as there is a support at the joint between the front and the side. This box could easily be made without the dovetails. In that case, little more than a mitre box, some chisels, and adjustable clamps for gluing would be needed to fashion a reproduction according to the specifications with this article. Both boxes are stained a dark brown and appear to be varnished.
Part of the joy of shooting the old-fashioned guns is basking in the aura of antiquity they represent. Surviving antique shooting boxes such as these seem to be rather uncommon; reproductions may be frequently overlooked as useful accessories, but I suspect they can provide one more ingredient in our shooting enjoyment.
Thanks to Tom Johnson of Dummerston, Vermont for letting me include his shooting box (No. One).
Required Tools and MaterialsFor both boxes:
- mitre box and appropriate back saw
- narrow wood chisels for rabbeting dividers to sides of box (if desired)
- steel rule
- adjustable carpenter's square
- several C-clamps and large woodworkers' clamps for gluing
- one pair of brass hinges and screws as illustrated
- brass clasps for lid as illustrated
- folding brass handle secured to lid with wood screws
- white glue, liquid hide glue, or comparable substitute
- 1/2" X 18 steel brads (optional; if you choose to use brads, try them first on scrap to check for splitting)
- wood stain and varnish to taste
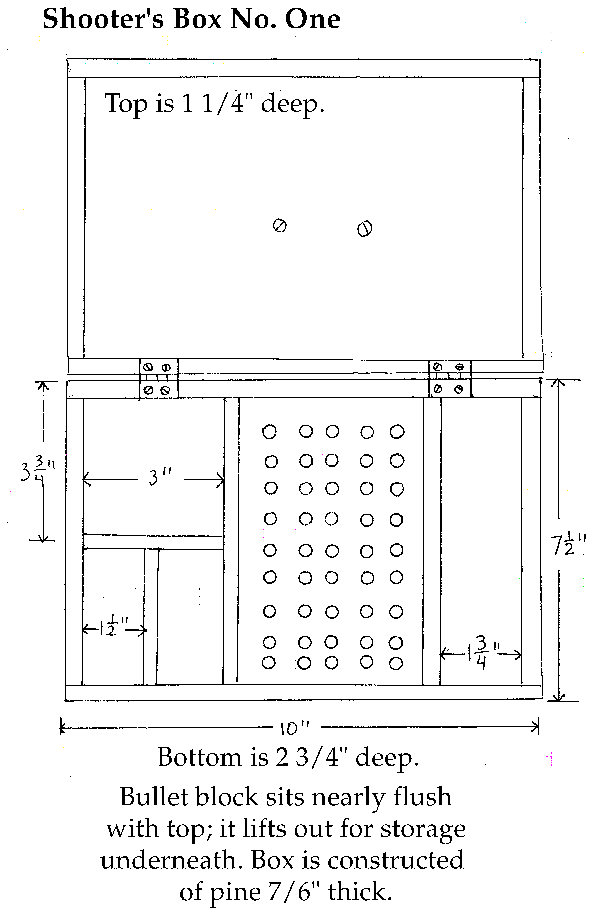
For Box No. One: Stock is clear pine 7/16" thick.
For top and bottom, you need two pieces 10" long by 7 1/2" wide. For the bottom edges, cut two pieces 10" long by 2 5/16" wide; and two pieces 6 5/8" long by 2 5/16" wide. To make the edges for the top, cut two pieces 10" long by 13/16" wide, and two 6 5/8" by 13/16". Glue and clamp these to the top and bottom pieces.
When the glue is dry, measure and install the partitions. In the original box, they are spaced as indicated in the drawing and rabbeted wherever they butt against another member. You can follow suit and make your partitions 1/4" longer than I suggest; if so, mark and cut your rabbets with a square and wood chisel before gluing the pieces together. Or for an easier flush fit, as illustrated, cut the two front-to-back dividers to 6 5/8" by 2 5/16"; the dimensions of the other two partitions at the left are not critical, but they measure about 3" by 2 5/16" and 3 5/16" by 2 5/16" in the original.
You can lay out your central loading block according to caliber and desired number of bullets, or leave it out. The loading block is supported by small shelves front and back glued and screwed to the wall of the box. It is held flush with the top of the partitions and lifts out to reveal a small storage area underneath. The leaves of the brass hinges are inlet so they are flush with the surrounding surfaces.
For Box No. Two: Stock is maple 1/4" thick.
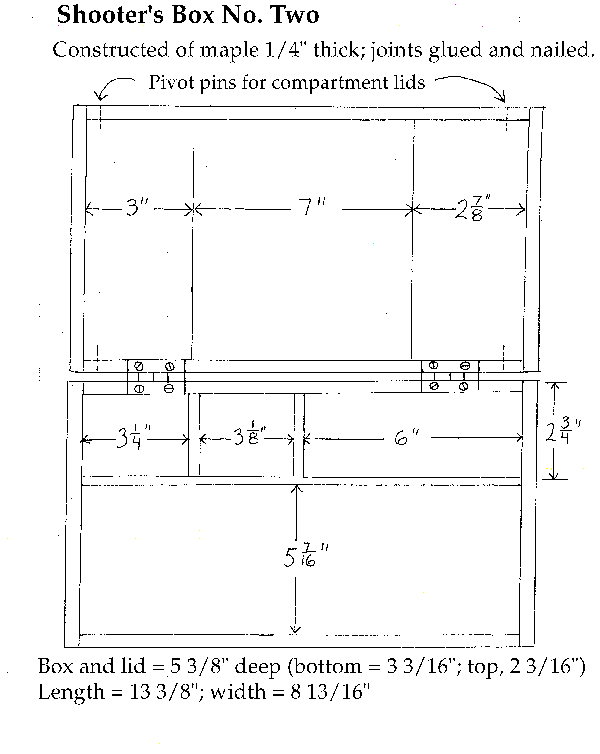
Top and bottom both are comprised of two boards measuring 13 3/8" by 5" and 13 3/8" by 3 3/16". Disregarding the dovetails at all corners, the sides of the bottom measure 12 3/4" by 3" and 8 3/8" by 3"; you will need two of each. For the top, make two each of the following dimensions: 12 3/4" by 1 15/16".
As with the first box, assemble the pieces for the top and bottom with glue and clamps (and brads, if desired). Then measure for partitions and install as indicated in the sketch. The swinging doors in the lid pivot on pins (nails) that enter the top and bottom edges at the indicated points. A simple, small screw eye, anchored in a partition in the top, protrudes through a hole in the closed door; a brass hook engages it to keep the door shut.
Once again, dimensions of the partitions are not crucial, but measurements for the spaces they define are given in the diagram. Partitions are glued in place. A few small nails are also present; they may be later additions.
Please note that the dimensions I provide were obtained by measurement of the antique boxes. Both have experienced some stress over the past century and a quarter, so you might want to allow an extra thirty-secondth of an inch on some dimensions and carefully trim to fit the pieces together. These boxes might serve merely as inspiration, and you can incorporate any changes you wish. On the other hand, if you prefer an exercise in duplicating a documented, 100-percent historically correct shooter's box, you can follow the plans to the letter. Good luck and good shooting!
|
|
Detail Drawing of Box Number One |
|
|
Detail Drawing of Box Number Two |